Creating and Using Variables
Table of Contents
Video Tutorial
Set Variable
One common scenario where this comes up is when we need to generate a unique email address for a signup form, then wish to assert that email address later on.
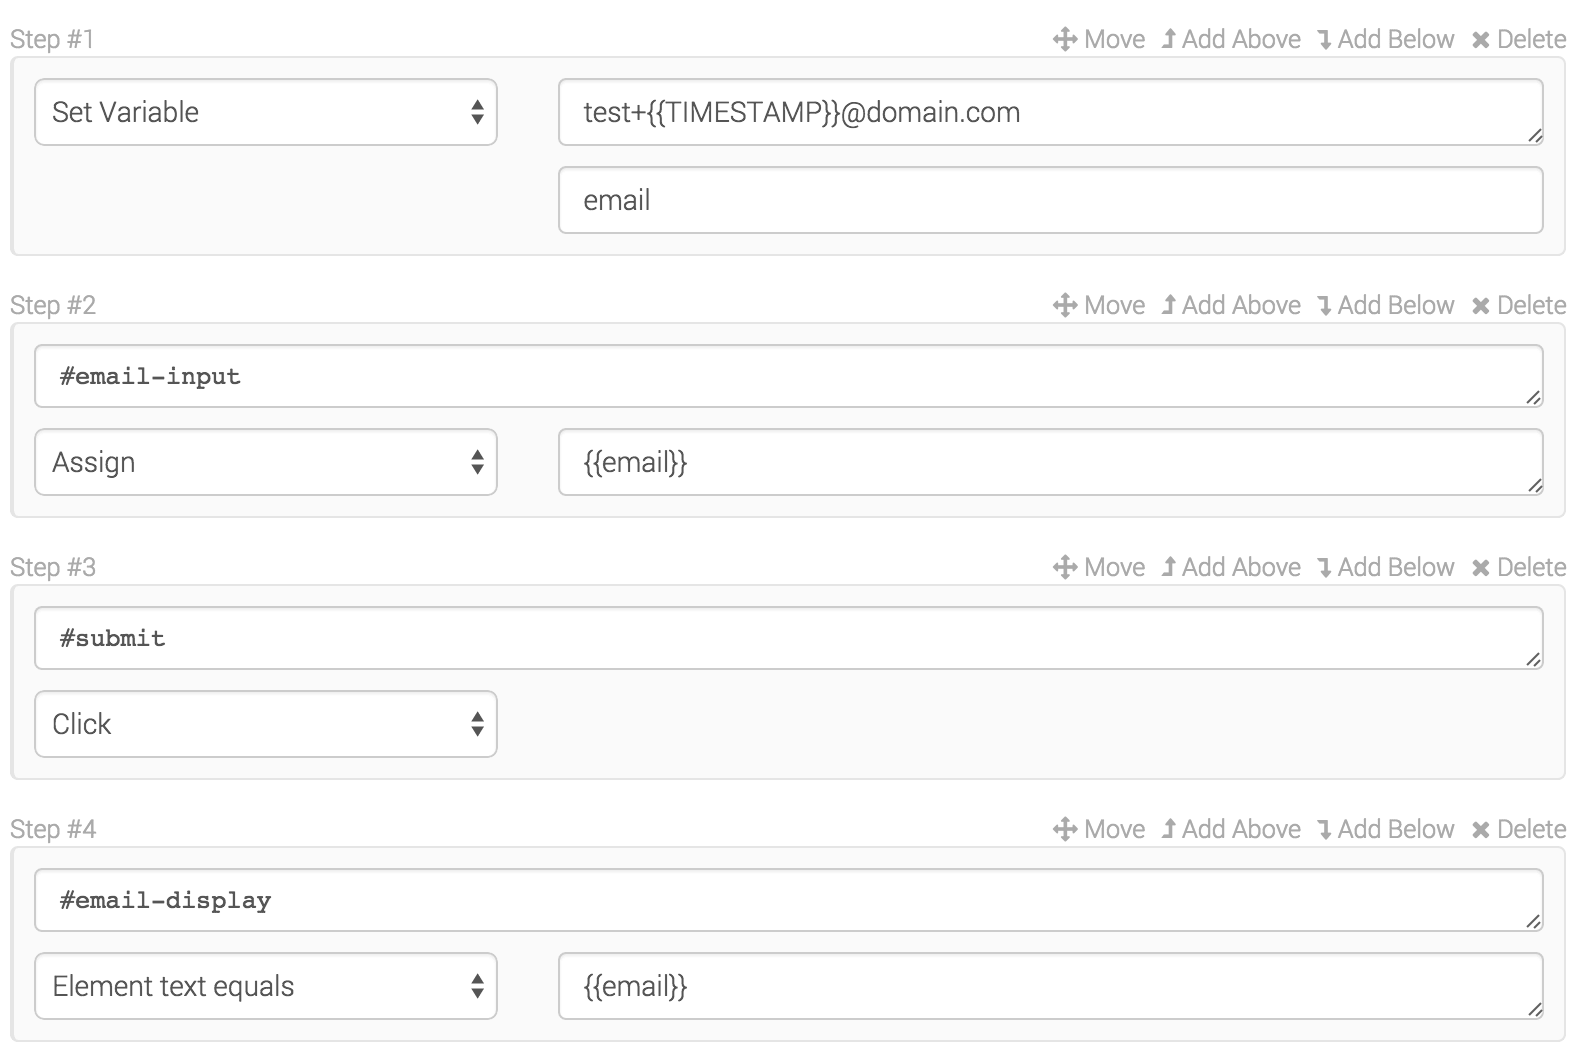
You can see in the test above that we’re creating a unique email address (using one of our built-in value generators) then storing it in a variable named “email” with the “Set Variable” command. The value in the “email” variable can then be accessed using {{email}} notation. You can see that we’re assigning it to the email field, submitting the form, then asserting that the email address is present in the display element on the following page.
Built-in Variables
We offer a range of built-in variables that can be used for making unique values and creating filler details. We’ve categoried these options into “Simple” and “Specific” variables.
You may find that you need to generate a unique value each time a test is run. For instance, you may need to create a new email address each time you test your website’s signup form. We provide two built-in variables for a numeric (millisecond based) timestamp and a random alphanumeric string, respectively.
Simple Variables
{{timestamp}}- This will generate a numeric timestamp (ex:
1565047520521) {{alphanumeric}}- This will generate a random 16 character alphanumeric string (ex:
x5Rq9vZ0meC6wlP3)
Instead of assigning test@domain.com as the email address in your form, you can use test+{{timestamp}}@domain.com to generate a unique email address with each test. If you are looking to use the generated email address in various steps, we suggest using the “Set Variable” command to place it into a variable, which can then be reused in multiple steps.
To assign more specific values, the variables below can be used. You must be using Chrome or Firefox v66+ to have access to these variables. They are not available in our legacy browser options. Also be aware that these values are chosen from a pool of data and will repeat over time. You are not guaranteed unique values. For guaranteed uniqueness, consider using one of the “Simple” built-in options above.
Mock Variables
{{name.firstName}}- Random first name (ex:
Fred) {{name.lastName}}- Random last name (ex:
Doyle) {{name.prefix}}- Random name prefix (ex:
Mrs.) {{name.suffix}}- Random name suffix (ex:
Jr.) {{name.title}}- Random job title (ex:
Product Division Supervisor) {{company.companyName}}- Random company name (ex:
Ondricka LLC) {{address.streetAddress}}- Random street address (ex:
395 Russel Place) {{address.city}}- Random city name (ex:
Abbottville) {{address.state}}- Random US state name (ex:
Hawaii) {{address.stateAbbr}}- Random US state abbreviation (ex:
NM) {{address.zipCode}}- Random US zip code (ex:
92624) {{address.countryCode}}- Random 2-letter country abbreviation (ex:
DK) {{phone.phoneNumber}}- Random phone number in any one of various format (ex:
1-393-740-6680 x958) {{phone.phoneNumberFormat}}- Random phone number in the ###-###-#### format (ex:
805-848-1499) {{image.avatar}}- Avatar image URL which can be used in a file upload step (ex:
https://app.ghostinspector.com/images/faker-avatar.jpg) {{internet.email}}- Random e-mail address (ex:
Erick_Lakin@hotmail.com)
Note that this will not always be unique. Use thetest+{{timestamp}}@domain.comapproach above for unique e-mail addresses. {{internet.password}}- Random password (ex:
rF_nnm3wAmdQvs5) {{internet.ip}}- Random IP Address (ex:
240.152.174.36) {{internet.color}}- Random color in hex format (ex:
#074d24) {{date.month}}- Random month name (ex:
December) {{date.weekday}}- Random weekday name (ex:
Sunday) {{date.past}}- Random past date (ex:
2016-05-23T01:44:11.857Z) {{date.future}}- Random future date (ex:
2028-11-30T13:49:50.478Z) {{commerce.productName}}- Random product name (ex:
Unbranded Metal Car) {{commerce.price}}- Random numerical price (ex:
418.00) {{lorem.text}}- Random filler text (ex:
Cum alias eos aliquam minus et molestias est. Aut cupiditate harum necessitatibus.) {{random.number}}- Random number (ex:
5190) {{random.uuid}}- Random UUID (ex:
70a41166-0b74-436b-9125-868e1f3640a1)
We’ve only listed the more common options above. For a complete list (including examples), visit the Faker.js documentation. Please note that the system module is not available.
Runtime Variables
Current result
You can access any attribute of the current result using the syntax {{result.attribute}}. Note that this functionality is read-only, the result cannot be modified.
Here is a list of common attributes, but can find the full list in our API docs.
{{result.autoRetryTriggered}}truewhen an execution is the result of auto-retry, otherwisefalse{{result.browser}}- The browser the current result is running in, eg: 'chrome-99'
{{result.dateCreated}}- Date the result was created (GMT), eg
2021-07-08T23:15:57.530Z {{result.name}}- The name of the current test result
{{result.region}}- The region the current result is running in
{{result.startUrl}}- The start URL of the current execution
{{result.steps.0.passing}}- Access specific step attributes using the index (
N) of the step{{result.steps.N.attribute}}. Note that the step index is 0-based {{result.suiteResult}}- The ID of the suite result execution is a part of, otherwise
null {{result.variables.myVar}}- Access any of the variables currently present during this execution
{{result.user.name}}- The name of the user who executed this test
{{result.viewportSize.width}}- Width of the current result viewport
{{result.viewportSize.height}}- Height of the current result viewport
Last step
Additionally you can acess the most recently-executed step using the following syntax:
{{lastStep.sequence}}- The sequence number of the previous step (0-based)
{{lastStep.passing}}- The passing status of the previous step
{{lastStep.value}}- The value captured during the last step (if any)
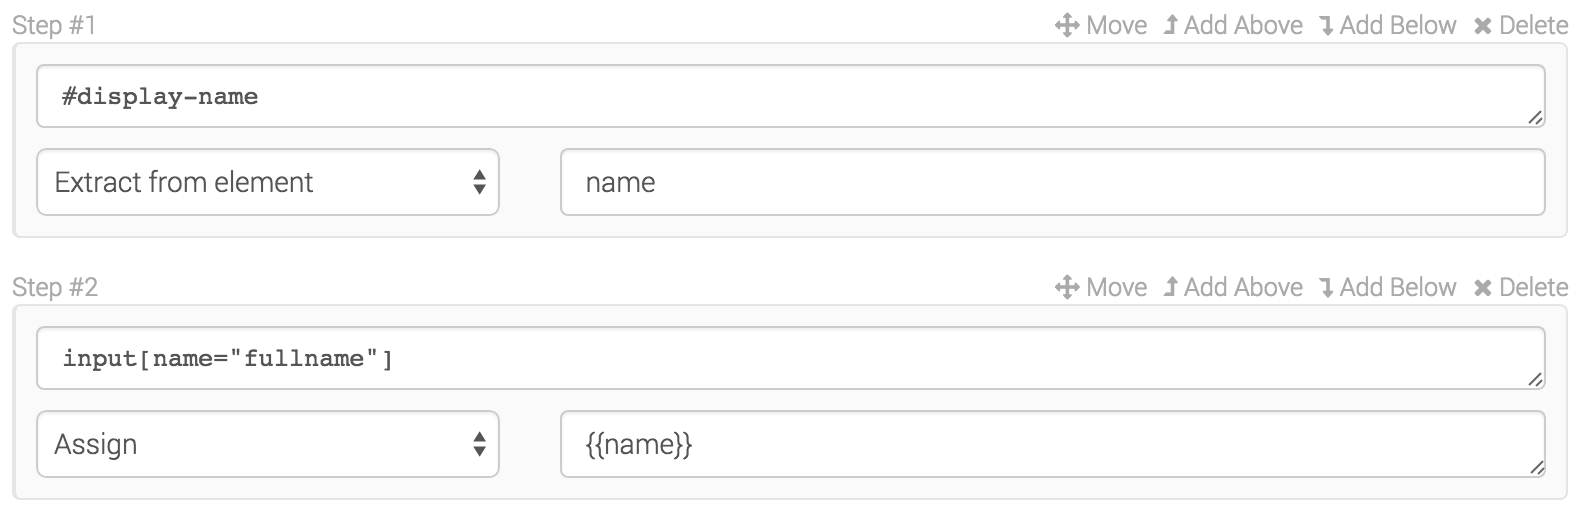
Extract from Element
This command allows you to extract the contents of value of an element and store it in a variable for use in later steps.
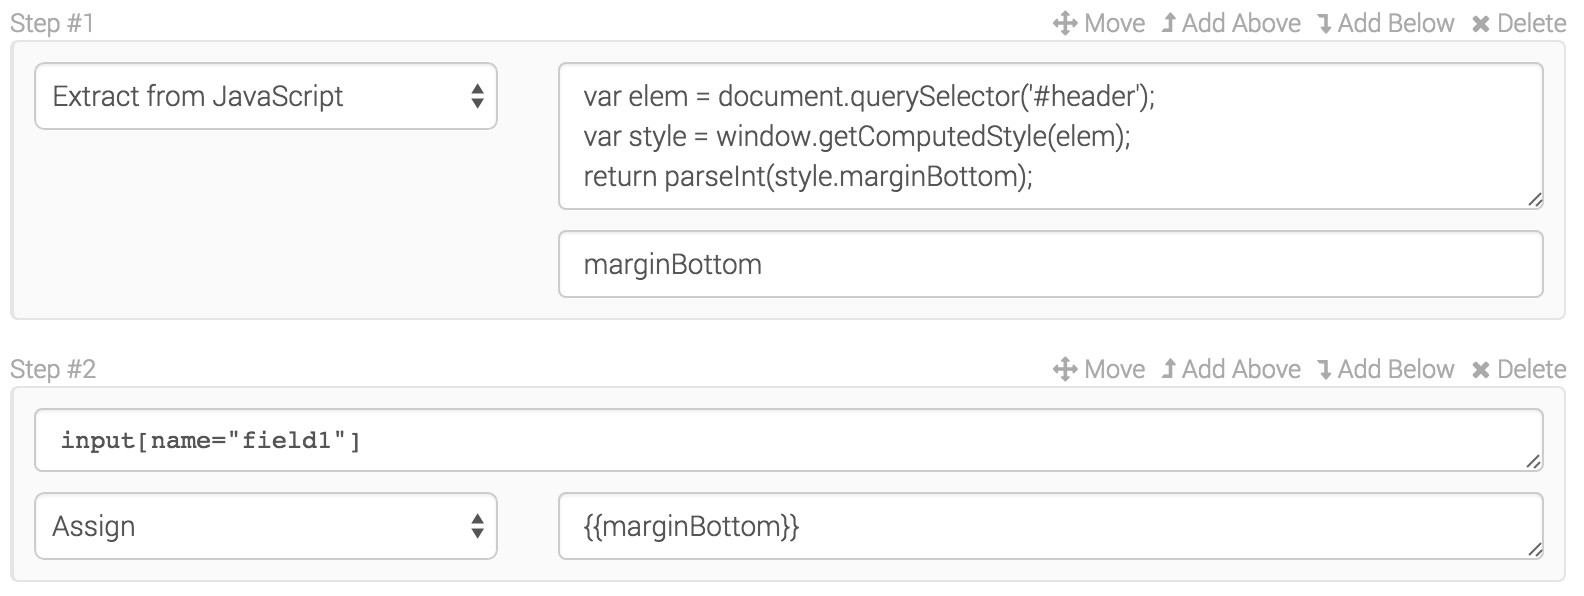
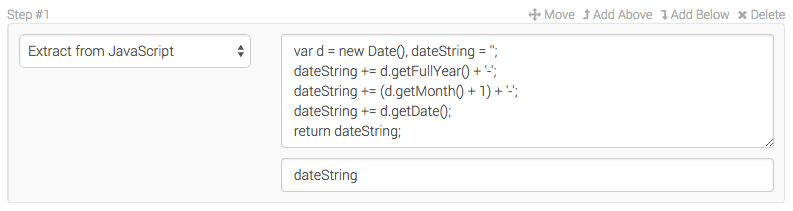
Extract from JavaScript
This command allows you to return a value from custom client-side JavaScript and store it in a variable for use in later steps.
You can also use this functionality, along with JavaScript’s Date functions to create and use custom date strings in your test. This example will return the current date in YYYY-MM-DD format.
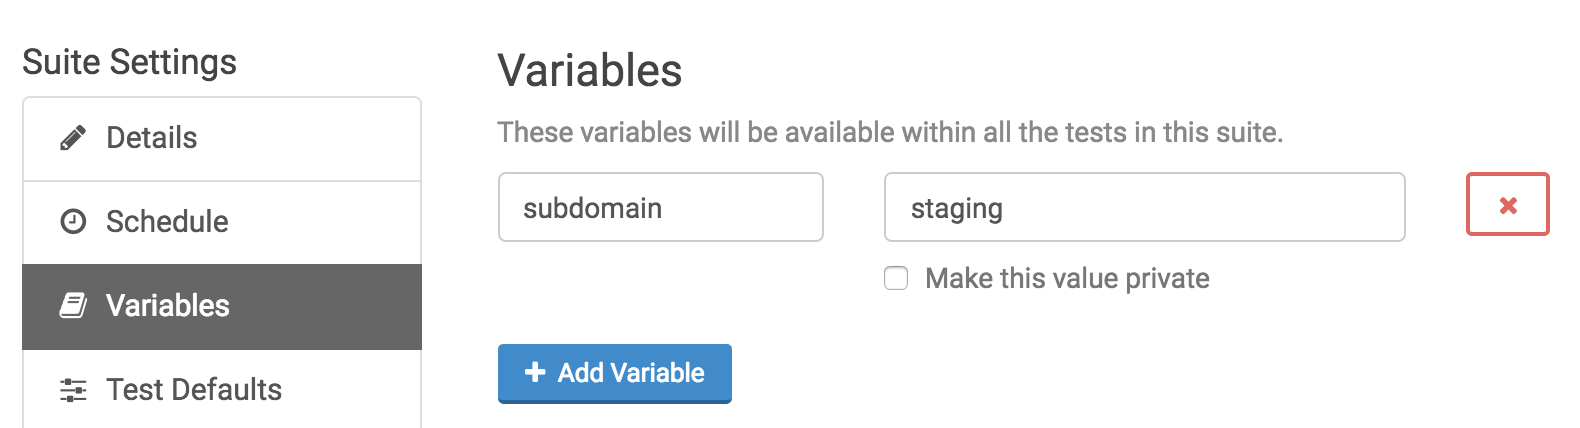
Suite-level Variables
Variables can be defined at the suite level under Settings > Variables. These variables are available within all tests in the suite when they are run.
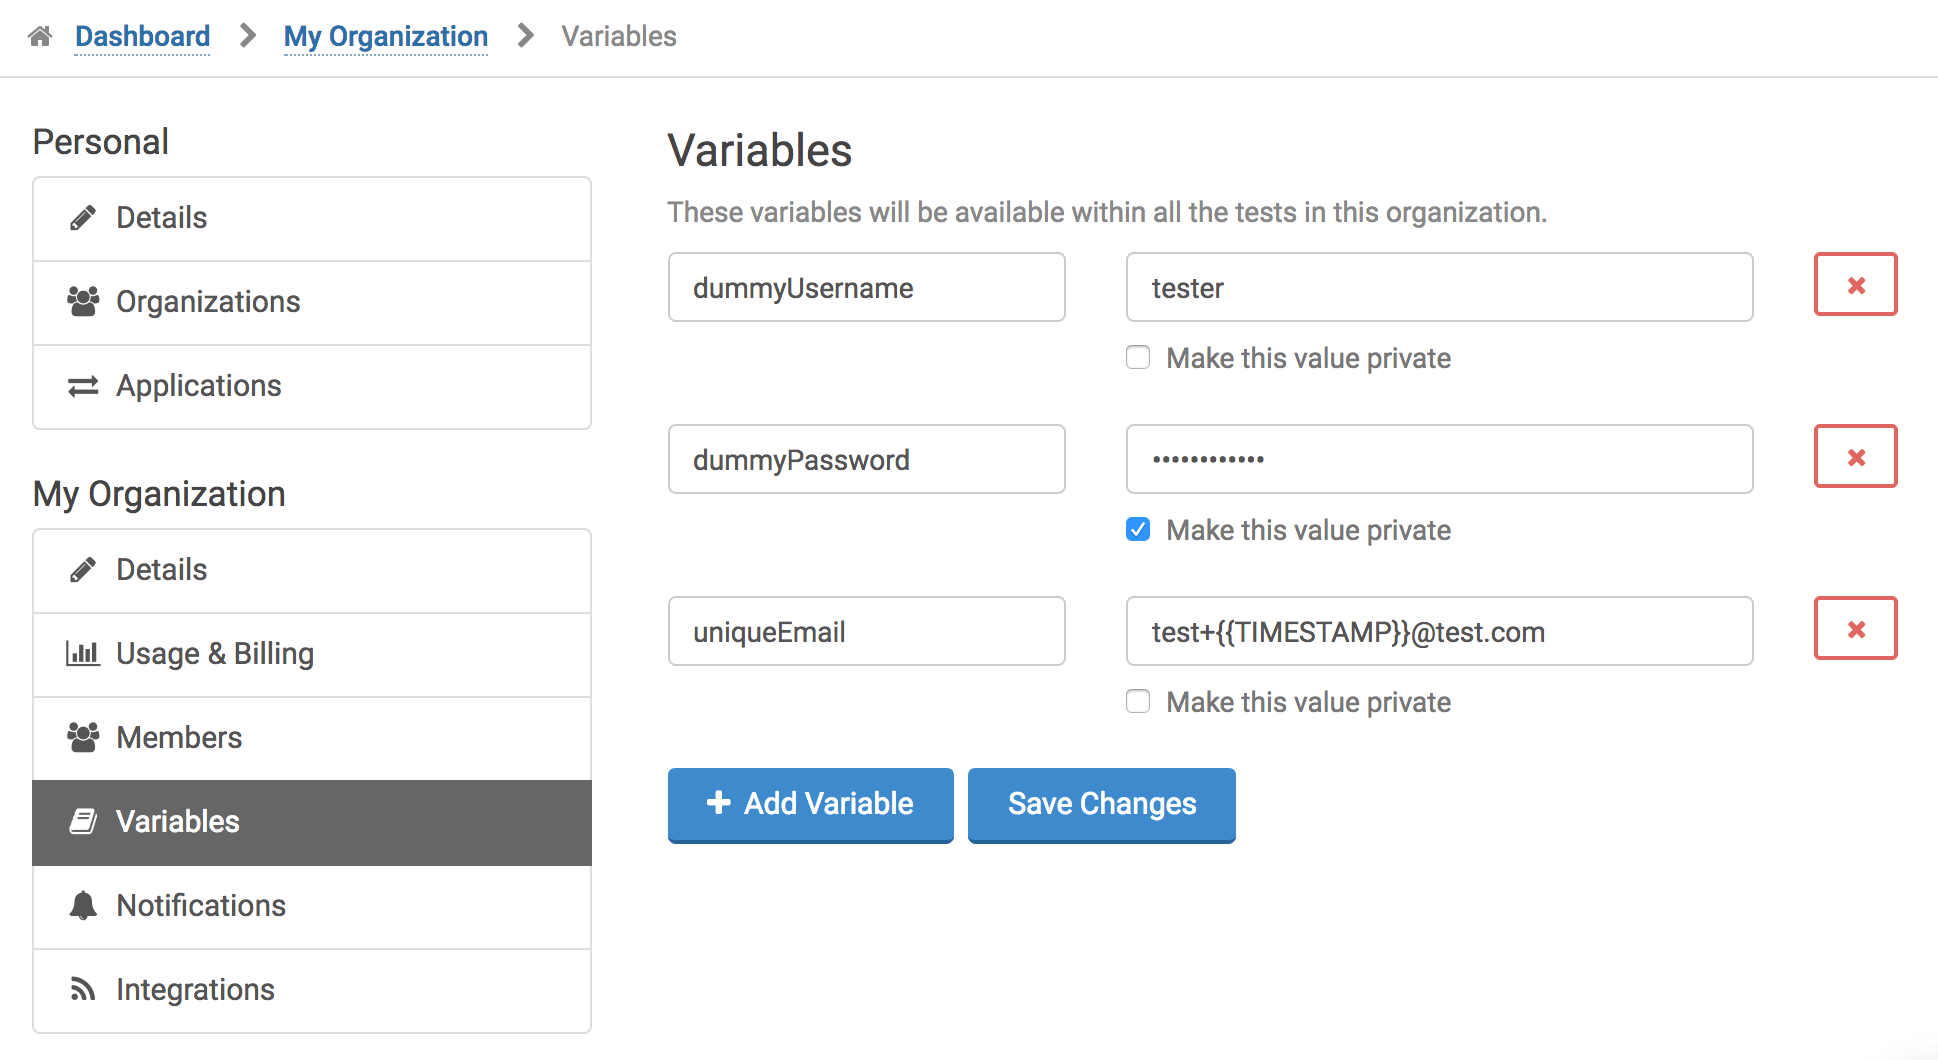
Organization-level Variables
Variables can be defined at the organization level. If you hover over your name on the top right of the application, then click on “Account Settings”, you’ll land on a page that lists your organization on the left side menu with various options underneath. Among them is a “Variables” item. These variables are available within all tests in your organization when they are run.
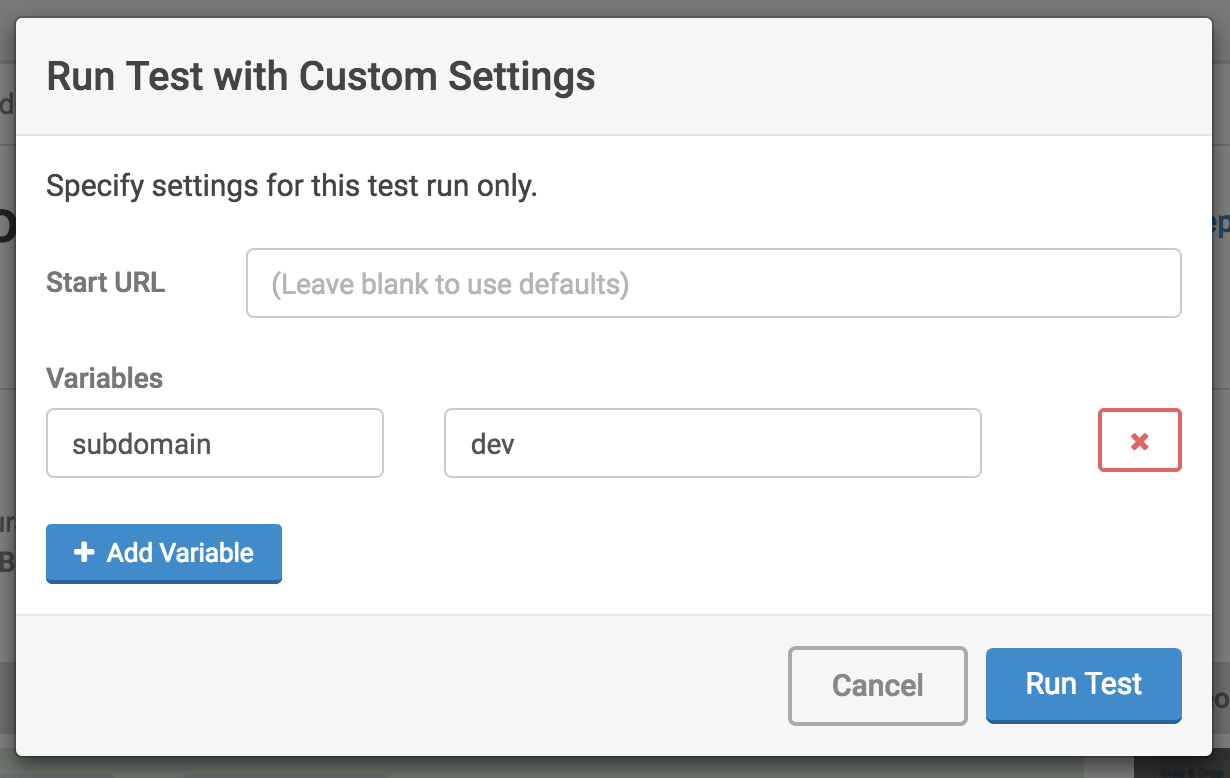
Variables via Application Execution
You can also easily set variables on the fly when triggering tests or suites in our application using the “Run with Custom Settings…” option accessible in the “More” dropdown menu at the top of the page.
Variables via API Execution
Variables can be passed into your test or suite runs as simple GET paramaters when you execute via the API. See our API documentation for details.
Accessing Variables in JavaScript
You may wish to access Ghost Inspector variables inside a JavaScript step or step condition. Variable replacement is done prior to the JavaScript code being executed so you can use our standard variable syntax right in your code. You can simply assign the Ghost Inspector variable to a local JavaScript variable or use it directly. The one caveat is that you must wrap the variable in quotes to ensure that JavaScript interprets the injected value as a string, like this:
const foo = '{{varName}}'
console.log(foo)
console.log('{{anotherVar}}')
Modifying Variables
To modify the value of a variable, use an Extact from JavaScript step that references the variable and modifies it as desired. The new value can be returned into a variable of the same name (updating its value) or into a newly named variable.
Numerical values can be inserted (without quotes) and modified. For instance, a counter can be incremented:
return {{counter}} + 1
String values must be inserted within quotes. They can be modified like any other string in JavaScript:
const greeting = '{{varName}}'
return greeting.replace('hello', 'hi')
Escaping Variables
Ghost Inspector’s variable syntax uses double curly brackets like this {{varName}}. This syntax will automatically be replaced by the system. In rare cases, you may wish to use a string with this syntax but avoid the replacement. For instance, you may want to assign the value {{varName}} into a text input as is, without it being replaced. This can be a bit tricky. Our current suggested approach is to format the string with single curly brackets, replace the single brackets with a double brackets using JavaScript, then assign the string with JavaScript like this:
var str = 'String with {variable} in it'
str = str.replace(/{/g, '{{').replace(/}/g, '}}')
document.querySelector('.input').value = str