Common Testing Scenarios
Table of Contents
Assert URLs
You may wish to verify the URL of the page that you are on during your test. There are two methods available for doing this. The simplest is to use a stardard assertion step, such as “Element text equals”, and set the target of the step to url. Alternative, you can check the URL of the current page using your own JavaScript code in a JavaScript returns true assertion:
return window.location.href === 'https://www.sampleurl.com'
Error Pages
You may wish to check for error pages during your tests. It is common for applications to display custom pages for HTTP error statuses such as 400, 401, 403, 404, 500, 502, 503, 504 and others. While we do not currently offer the ability the assert HTTP status codes directly in the HTTP response, you can check for error pages by asserting the presence of related text on the page itself. This can be as simple as using an “Element text contains” assertion to check the title or body element for the text “404”.
Disabling Test Steps
You may wish to disable specific steps within a test. While we do not have a dedicated option in the test editor, a step condition can be used to easily disable one step or many steps. Simply add a condition to step (or steps) with the code return false.

Testing Stripe Checkout
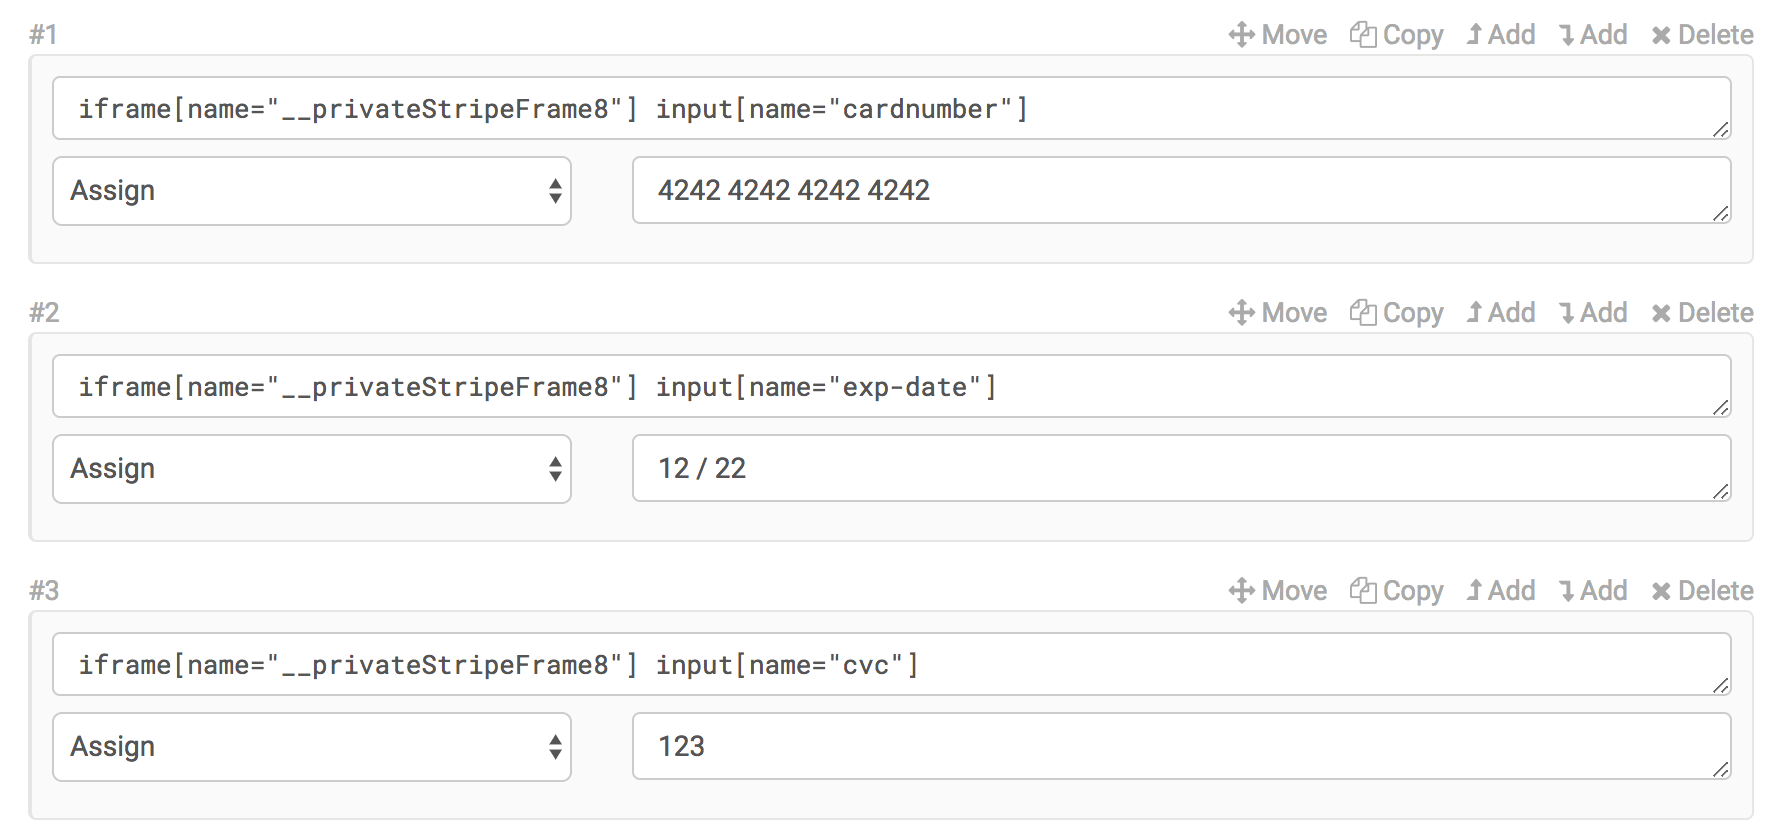
If you've used the test recorder to capture your actions during a Stripe checkout, you should see a set of steps similar to the ones shown below.

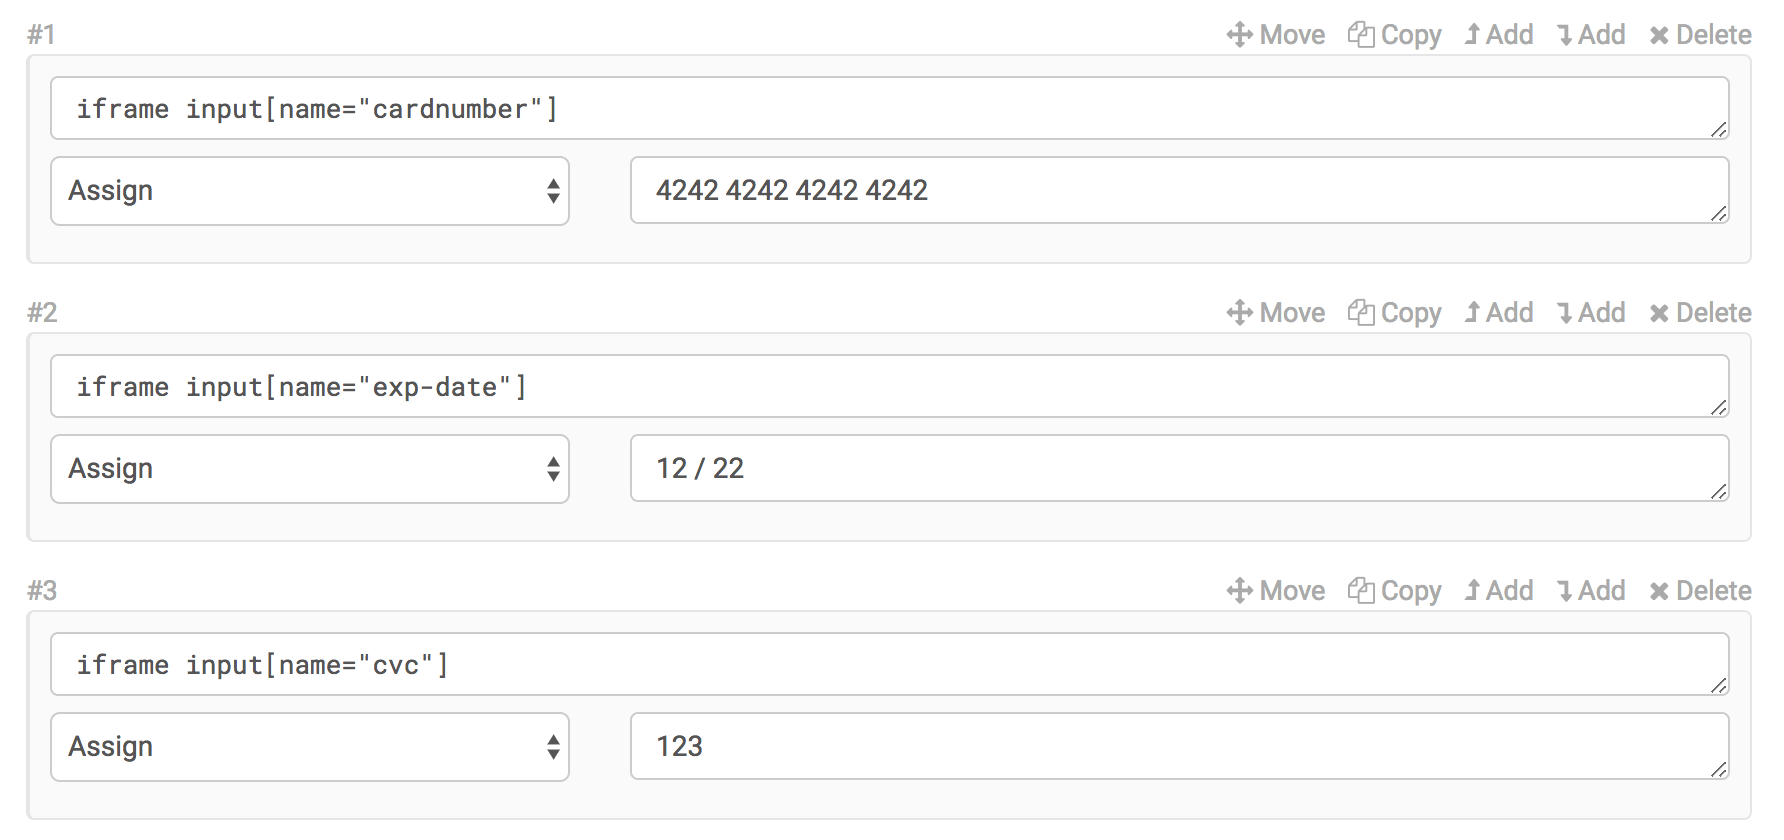
These steps should work properly from the get go in your test. However, the __privateStripeFrame8 that is used in the name attribute of the iframe could potentially change. In most cases, you can broaden these selectors by changing the iframe[name="__privateStripeFrame8"] portion to simply iframe. Ghost Inspector will still be able to locate the elements and will continue to work even if the iframe's name attribute changes.

If you find that the credit card information is being jumbled when it is assigned during the test run, that typically means that the assignment is happening too quickly and is conflicting with Stripe's validation logic. In this case, it's best to break up the single “Assign” step into individual “Keypress” steps to key in the values one digit at a time. The step selector can remain the same. You'll simply add a “Keypress” step for each digit.

Please keep in mind that there are multiple versions of Stripe Checkout and it is continually being updated. If you've attempted the approach above and you are seeing different selectors or having trouble getting your test to pass properly, please feel free to reach out to support.
A/B Testing
Interacting with an A/B testing can be a little tricky since your Ghost Inspector test may be sent down different “paths” which prevent the test steps from working as expected. However, our conditional steps provide a handy tool for dealing with such a situation. This feature allows you to check for a condition with JavaScript prior to a step being executed, then either carry out the step normally or skip it, depending on the outcome of the JavaScript check. Using this approach, you can support multiple “paths” in a single test and execute only certain steps depending on the scenario that the A/B test has presented.
Alternatively, if you're able to control the A/B test's variations with some kind of parameters (like a GET parameter in the start URL), then you may opt to just duplicate the test and customize it for each variation explicitly.
Date Pickers
Date picker widgets often present both the challenge of dealing with a complex UI and the need to keep the selection current, so that it doesn't become “stale” as time progresses. Selecting tomorrow's date for a hotel booking today may be acceptable, but could result in an error 2 days from now when that date has passed. Unfortunately Ghost Inspector's test recorder isn't able to determine intentions while recording, so it will typically generate a selector which matches the exact date you chose. This will need to be adjusted in the test editor after the test is recorded.
In many cases, selecting the next available date is acceptable for testing purposes. Fortunately, most date picker widgets include classes that make it fairly easy to target the next available day with a selector like .datepicker td.day.available. It's worth investigating the DOM around your date picker widget to see if a simple, durable selector can be created to always target the next available day.
Select2 Menus
Ghost Inspector supports interacting with Select2 menus, but your steps may need a bit of tweaking in the editor after being recorded. Select2 hides your HTML select element and replaces it with a rendered version using regular HTML elements. Select2 will often use dynamic ID attributes — meaning that it will assign an ID attribute that changes on each page load. When this happens, the Ghost Inspector test runs can't find the selection you've recorded because the associated element is constantly changing. There are two different approaches that can be used for interacting with Select2 menus.
Making Selections with a Click Step
In order to click on the proper menu selection, we'll need to make sure the step selector being used is sustainable and is not using a dynamic ID (which may have been captured by the test recorder). We'll use an Xpath selector to do this because it has the ability to target an element using it's text contents. The click step's target should look something like this (where “Option Label” is the label of the option that you want to select):
//*[contains(@class, "select2-container--open")]//li[@role="treeitem"][contains(text(), "Option Label")]
That selector is essentially saying, within the open Select2 menu, find the menu item labeled &“Option Label”.
Making Selections using Select2's JavaScript API
We can trigger changes on our Select2 dropdown using the Select2 programmatic API. The Select2 API is identical to the jQuery API for changing a select element, so given this select element:
<select id="my-select-box">
  <option value="val1">Value 1</option>
  <option value="val2">Value 2</option>
</select>
We can use an Execute JavaScript step to change our Select2 selection:
$('#my-select-box').val('val2').trigger('change')
This code assumes that jQuery is present on the page (which should be the case when using Select2). If jQuery is not present, you can add the library dynamically. Check out the Select2 API docs for more details.
iFrame & Frame Support
Ghost Inspector supports both iframes and traditional frames, but you must use iframe in the CSS selector for the step target. For instance, consider a DOM that looks like this:
<div class="abc">
  <iframe name="xyz">
    <button class="btn">Click me</button>
  </iframe>
</div>
You cannot target the button with simply .abc .btn. You need to target it with something like iframe[name="xyz"] .btn or even just iframe .btn. The iframe element must be targeted specifically in the selector with the iframe element tag included to tip off the system. The same applies to traditional frame elements.
Ghost Inspector also supports nested iframes and nested frames using the same syntax. Both frame elements must be referenced in hierarchical order in the CSS selector. For example: iframe#outer iframe#inner .btn
The test recorder will attempt to record the necessary CSS selector automatically, though it may occasionally need to be tweaked afterwards — especially when nested frames are in use.
Additional Tab & Popup Window Support
Additional tabs and popup windows are supported and you're able to record directly inside them with the test recorder. When running tests, we don't have a specific syntax for targeting additonal tabs or popups. Instead, our system will first check the main window for the element you've specified. If it doesn't find the element, it'll begin cycling through any open tabs or popup windows looking for the element there.
This means that if you're targeting an element in an additional tab or popup window, you need to make sure the selector used in the step doesn't accidentally match an element inside of the main window. It needs to be unique enough to ensure that only a match within the tab or popup exists. In some cases you may need to tweak the CSS selector generated by the test recorder and make it a bit more specific to avoid collision.
If a tab or popup window is created during your test, Ghost Inspector will not show it in the video until you interact with an element in that window (as outlined above). It will not automatically show up in the video simply by being present. Ghost Inspector always shifts focus back to the main window between each step, so your test will need to explicitly target an element that exists only in the tab or popup window in order to see it in the video.
Alert & Confirmation Boxes
Web browsers offer a few types of built-in alerts and dialogs. While they have fallen out of favor due to a lack of support on mobile devices, they can still be triggered using JavaScript such as window.alert() and window.confirm(). Ghost Inspector is currently designed to accept these types of alerts automatically. This is not configurable at the moment. Ghost Inspector will auto-click “Ok” and window.confirm() will always return true. We do not currently have a method for clicking the “Cancel” option and returning false.
Shadow DOM
Shadow DOM support is available across all browsers using a special syntax to target Shadow DOM elements, or elements nested within the Shadow DOM, for example, to access the element `.inner-element` nested within a Shadow DOM component, you can use the following syntax:>>>.inner-element
Shadow DOM elements can also be accessed using JavaScript, for example:
const root = document.querySelector('.root-elem').shadowRoot
const elem = root.querySelector('.inner-element')
elem.click()
Injecting and Using jQuery
jQuery is a useful JavaScript library which can help you carry out actions on a web page. We do not inject jQuery on the page for you. However, you can access it within JavaScript steps if it’s already present, or you can inject it yourself.If jQuery is already present on the page you’re interacting with, you can typically access it using the standard $() function. In some cases, jQuery is only available through it’s proper function name: jQuery() instead of $().
If you would like to use jQuery and it’s not present on the page, you can load it yourself with an Execute JavaScript step and this code (which adds jQuery v3.4.1 to the page):
var script = document.createElement('script')
script.src = 'https://code.jquery.com/jquery-3.4.1.min.js'
document.head.appendChild(script)
We recommend adding a 5 second (5000ms) “Pause” step afterwards to ensure that the library has time to download. Once complete, you can then use the injected jQuery with window.$() in future JavaScript steps on that page. Note that if you change pages during the test you will need to inject jQuery again.
Google Analytics
Google Analytics is a common on-page analytics system used by many websites. In some cases, you may want to check to ensure that Google Analytics is setup properly. In other cases, you may wish to exclude Ghost Inspector’s traffic to ensure that it doesn't affect your analytics.
Check for Google Analytics on a Page
It’s relatively easy to check for Google Analytics with a JavaScript returns true assertion that checks for it in the global window object using code like this:
return typeof window.ga === 'function'
That assertion will pass if Google Analytics is setup and fail if it isn’t. We recommend adding a 5 second (5000ms) “Pause” step before performing this check, since Google Analytics is typically loaded asynchronously.
Exclude Ghost Inspector Traffic from Google Analytics
We provide the IP addresses that our service uses to test your website, which you can exclude from your Google analytics data. Assuming that you're just using our “Northern Virginia, USA” region (which is the default), you'll just need to exclude the 4 IP addresses that we list at the top of the page. If you're using other geolocations, you'll need to exclude those IPs as well.
CAPTCHAs
A CAPTCHA is a program or system intended to distinguish human from machine input, typically as a way of thwarting spam and automated extraction of data from websites. CAPTCHAs are a bit tough to deal with during automated testing since they're specifically designed to prevent bots and automation from getting through — including something like Ghost Inspector. They cannot be solved in an automated way, so they need to be worked around or disabled during testing. Here are some options for dealing with CAPTCHAs:
- If you’re using an external CAPTCHA service such as ReCAPTCHA, their documentation provides a set of keys that can be used for testing. You may also be able to exclude your testing domains from the CAPTCHA.
- Add a method for disabling the CAPTCHA that only the test knows about. For example, setting a secret parameter or variable on the page that removes the CAPTCHA from the form or removing the CAPTCHA based on our public IP addresses.
- Run your tests on a development or staging environment and disable the CAPTCHA in that environment.
- Design your test in way so that it submits the form then checks for the CAPTCHA error. You won't be able to successfully submit the form this way, but you’ll be able to test that it's validating properly.
SMS OTP
One-time passwords (OTP) are sometimes sent to a phone number using SMS (text messages) in situations like two-factor authentication. If you need to access an OTP that is sent to a phone number during a Ghost Inspector test, you can do so with the help of Twilio. Twilio provides APIs for sending and receiving SMS messages (among other things). A phone number can be setup using Twilio to receive the SMS, then we can use their API to access the message inside of a JavaScript step during the Ghost Inspector test.
In order for this to work, you’ll need the ability to send the SMS messages to a Twilio phone number that you control. Note that setting up a phone number with Twilio and receiving messages may incur changes from Twilio.
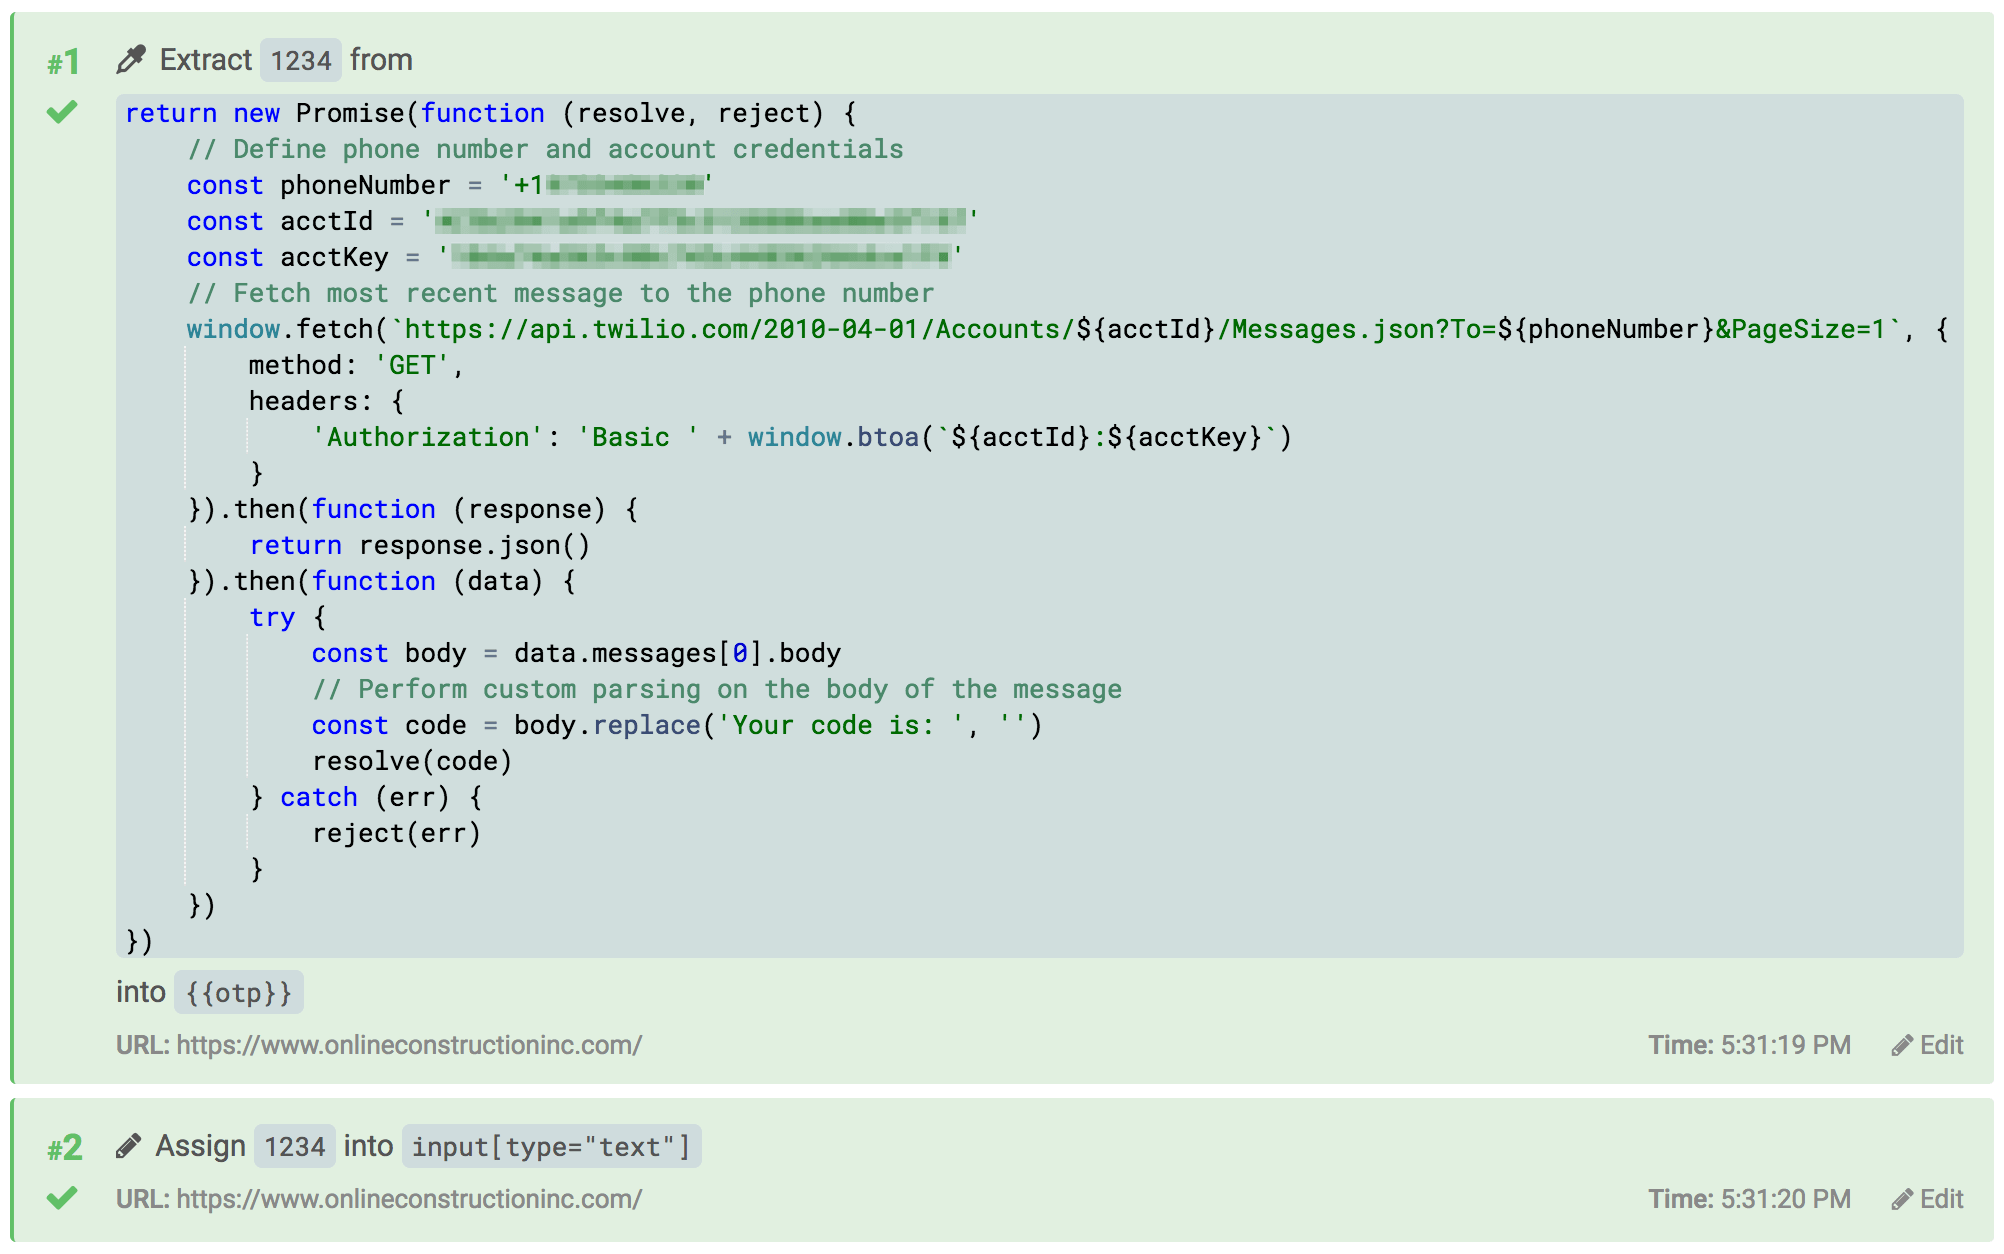
Once you have the required Twilio phone number and credentials, you can use an asynchronous “Extract from JavaScript“ to access the Twilio API, fetch the most recent message that was sent to the phone number, then parse out and return the OTP (or whatever you may need). The JavaScript code below can be used for this “Extract from JavaScript” step. You’ll need to swap in your Twilio phone number, account ID and account key. You’ll also need to modify the const code = body.replace('Your code is: ', '') line to fit your message and parse out the value as needed.
return new Promise(function (resolve, reject) {
  // Specify your Twilio phone number (without the + in front)
  const phoneNumber = '15555555555'
  // Specify your Twilio account number (on your dashboard)
  const acctId = 'xxxxxxxxxxxxxxxxxxxxxxxx'
  // Specify your the SID of your Twilio API key
  const sid = 'xxxxxxxxxxxxxxxxxxxxxxxx'
  // Specify your the secret of your Twilio API key
  const secret = 'xxxxxxxxxxxxxxxxxxxxxxxx'
  // Fetch most recent message to the phone number
  window
    .fetch(
      `https://api.twilio.com/2010-04-01/Accounts/${acctId}/Messages.json?To=%2B${phoneNumber}&PageSize=1`,
      {
        method: 'GET',
        headers: {
          Authorization: 'Basic ' + window.btoa(`${sid}:${secret}`),
        },
      }
    )
    .then(function (response) {
      return response.json()
    })
    .then(function (data) {
      try {
        // Fetch body of message
        const body = data.messages[0].body
        let code = body
        // Perform custom parsing on the body of the message and resolve
        code = code.replace('Your code is: ', '')
        resolve(code)
      } catch (err) {
        reject(err)
      }
    })
})
Keep in mind that this step needs to come after the SMS message is sent during the test steps. It’s recommended that you add a 30 second “Pause” step before checking for the message to ensure time for deliverly. Lastly, it’s strongly recommended that you create a separate Twilio API for this operation with limited access for Ghost Inspector.

3rd Party Logins
Unfortunately, 3rd party logins that use Google, Facebook, LinkedIn, etc. will put security precautions in place (like 2FA) that are specifically meant to block access to automation tools like Ghost Inspector. This can make logging in during a test challening or, in some cases, impossible.
Some solutions allow you to enable unrestricted access for specific IP addresses. This can be a viable approach since we publish those for our test runners. However, this is not always common with large providers.
If the security challenge is email or SMS based, we do have our email service and an option for using a Twilio phone number and fetching the code using their API. Unfortunately 2FA codes that are accessed via apps are not something that Ghost Inspector can access. Nor can we overcome CAPTCHAs, if one is presented.
In general, we recommend avoiding logins with 3rd party services like Google, Facebook, and others during your tests. Instead, we recommend that you use a login directly to your application since you will be in control of the behavior. We don't have control over how 3rd parties behave when automated tests interact with them. They often treat the interactions as suspicious behavior without providing a workaround. In some cases, automated access may be in direct violation of their Terms of Service.
If you are attempting to log into a 3rd party email service such as Gmail, this will not likely be possible due to the reasons above. We have a built-in email service that can be used for receiving and viewing emails during your tests.
Embedded Editors
Embedded editors like CKEditor often make use of contenteditable elements, which are challenging for Ghost Inspector to interact with directly. Simple “Assign” steps cannot be used. Fortunately, CKEditor (and most other editors) provide a JavaScript API for interacting. This means you can add an Execute JavaScript step via our test editor and interact with the editor using JavaScript.
CKEditor
window.CKEDITOR.instances['instance-name-here'].setData('This is sample text.')
Draft.js
When interacting with Draft.js, you can use a normal “Assign” step and set the CSS target to .public-DraftEditor-content.
Kendo UI Editor
$('#editor').data('kendoEditor').value('This is sample text.')
TinyMCE
window.tinymce.activeEditor.setContent('This is sample text.')
Scrolling a page within a test
Some websites use lazy loading techniques to trigger events and reveal elements as the user scrolls down the page. By default, our browsers do not manually scroll down and trigger these events. However, if necessary, that effect can be achieved through the combination of JavaScript steps and a Pause step.
First, add a new step and set the operation to “Execute JavaScript”. Add this code to your step:
var body = document.documentElement || document.body
body.scrollTop = 0
window.scroller = setInterval(function () {
  body.scrollTop += 500
}, 500)
The code above scrolls the page by 500 pixels every 500 milliseconds (a total of 1000 pixels per second).
Next, add a “Pause” step so that the Javascript code has time to scroll all the way down the page. Pause steps use milliseconds, and since the ratio of pixels to milliseconds is 1:1, we can simply set the pause value to the height of our page in pixels. If our page is 10000px, set the pause value to 10000.
Lastly, we’ll need to add another “Execute JavaScript” step to cancel the scrolling loop and scroll back to the top of the page. Add this code to your second JavaScript step:
clearInterval(window.scroller)
var body = document.documentElement || document.body
body.scrollTop = 0
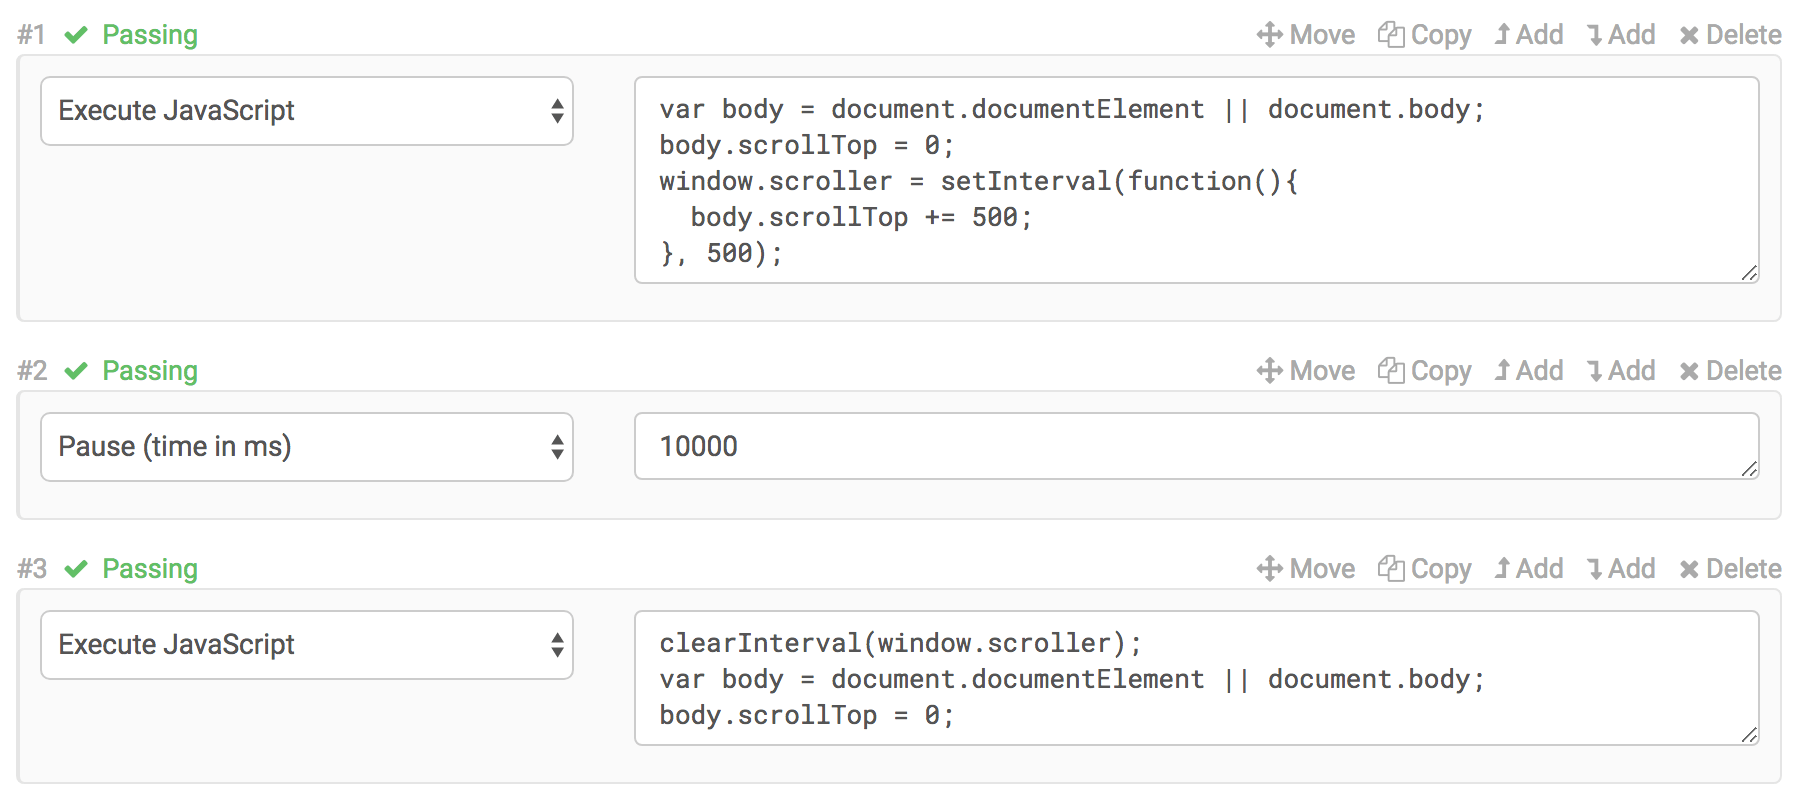
Once complete, your steps should look like the screenshot below and scroll all the way down your page – triggering any events along the way.

Ensure that an image has loaded properly
You can check to see if an image has loaded during a test by checking the “naturalWidth” field of the image element. If this field is equal to 0, then the image has not loaded. A non-zero value means that the image has loaded. This means that you can use a JavaScript returns true assertion to check whether an image has loaded with code like this:
return document.querySelector('.image-selector').naturalWidth !== 0
(Where .image-selector is the selector for the image element.)
This assertion will pass if the image loads and fail if it does not.
Improving performance when interacting with transparent elements
By default, our test runner will wait up the the Element Timeout setting (default 15 seconds) for an element to be present on the page before we interact with it, eg: click or input. The libraries we use internally however rely on the element to be "visible" on the page for it to meet the criteria of "present on the page" however, some UI libraries use CSS tricks to "hide" the actual browser input(s) in order to display a custom element to the end user. Our system has a provision for this, however the default logic internally will wait the full Element Timeout before trying to assign/interact with the element using JavaScript as a fallback. This results in a passing step that, rather than being very quick (less than a second or two) ends up being very slow (the Element Timeout value). Having several of these types of elements in a test can make a test very slow, and even sometimes time out after 10 minutes.
In these cases when an element is known to actually be "hidden" by the CSS (visible: 0, etc) we provide the flag giFlag_UseJavaScriptClickForNonVisibleElements that can be set as a variable in your test with a value of 1. This flag will bypass the default behaviour and directly use JavaScript to interact with the input element, speeding up the test execution.
While this can dramatically speed up some tests, we recommend only using this flag sparingly. We suggest setting this variable to 1 right before encountering the problematic element, and then turning it off 0 immediately after it's no longer required. This targeted approach prevents the broad impact that can arise from setting the variable at the test, suite, or organization-wide level.